Chapter 30 — Stops, trails, and the ATR rule
A stop loss is the single most important order a trader places. Not because it determines whether the trade wins or loses — that is determined by direction. Because it determines whether the worst-case version of the trade is survivable.
A trader without stops is not a trader; they are a position holder hoping the market agrees with their thesis. They have unlimited downside on every trade. Sooner or later — and it is always sooner than expected — a single trade goes far enough against them to materially impair the account. From that moment, every subsequent trade is fighting to recover, sized inappropriately for the reduced capital, and producing poor decisions under stress.
A trader with stops is in business. The trade either works (within risk) or doesn't (within risk). The downside is bounded; the next trade is independent; the math of long-run compounding can do its work.
This chapter is about placing stops well. Where, how wide, when to trail, when to leave them alone.
Three legitimate stop placement methods
There are three sound approaches to stop placement. Most of the bad ones share a common feature: they ignore the chart, the volatility, or both.
Method 1 — Structural stop. Place the stop just beyond a chart level that, if breached, invalidates the trade thesis. For a long entry, the stop goes below a recent swing low, below a major moving average, or below a horizontal support level. For a short entry, above the analogous resistance level. The principle: if price reaches the stop, your read of the chart structure was wrong.
Strengths: tightly linked to thesis. If stopped, you have learned something. Weaknesses: stop distance varies trade to trade, sometimes producing inconsistent risk/reward profiles.
Method 2 — ATR-based stop. Place the stop at a fixed multiple of the Average True Range below entry (for longs) or above entry (for shorts). Common multiples: 1.0 ATR for tight, 1.5-2.0 ATR for swing, 2.5-4.0 ATR for position trades.
Strengths: adapts automatically to volatility regime. Consistent in risk-adjusted terms across trades. Weaknesses: ignores chart structure. A clean ATR stop can be just outside a major support level, getting hit by noise that would have reversed at the level.
Method 3 — Hybrid (recommended). Place the stop at whichever is wider — the structural level or the ATR-based level. This combines the strengths of both. If a structural level is too close (ATR-stop would be wider), use the ATR-stop. If volatility is unusually compressed (ATR-stop would be inside structure), use the structural stop.
For most discretionary swing traders, the hybrid approach produces the most resilient stop placement.
What does not work
A few common stop placement approaches that have negative expected value:
- "Round number" stops. Placing stops at $2,700 or $2,500 because they are visually clean. Every other retail trader does the same; algorithms know it; the levels get hunted. Always offset stops from obvious round numbers — $2,693 instead of $2,700 if your structure supports it.
- "Just below recent low" stops, placed minimally. If price has just made a swing low at $2,650 and you place the stop at $2,648, you are within typical noise of the level. Algorithms will sweep below the swing low to take stops before reversing. Place stops meaningfully below structural levels (at least 0.5 ATR clearance) or use a hybrid approach.
- Mental stops. Deciding "I'll exit if price goes against me" without placing a hard order in the book. In a fast move, you will be slower than the market. The stop will get worse than your intended level. Place hard stops in the book or use guaranteed stop products (where available).
- Fixed-dollar stops (e.g., always $30 below entry). Ignores volatility regime. Right size in some regimes, wrong size in others.
- Fixed-percentage stops (e.g., always 2% below entry). Same issue.
Stop adjustment and trailing
After a trade is open, the question becomes: when should the stop move?
The general rule: stops should only move in the direction of the trade. On a long, only up. On a short, only down. Never move a stop further against the trade, no matter how convinced you are that the move is temporary. Moving stops against the trade is rationalization, not analysis, and it is one of the most common pathways to large losses.
Three legitimate stop adjustment patterns:
Pattern A — Move to breakeven after 1R. When the trade is in profit by 1x your initial risk (1R), move the stop to breakeven (entry price). This guarantees that the worst case on the trade is now a scratch, not a loss. Trade off: some trades that would have ultimately won will get stopped at breakeven on a normal pullback before resuming.
Pattern B — Trail behind structure. As the trade moves in your favor and new swing highs (longs) or swing lows (shorts) form, move the stop to just beyond the most recent counter-trend swing. This keeps you in the trend as long as structure holds.
Pattern C — Trail by ATR. Move the stop up (longs) or down (shorts) by 1 ATR every time price closes 1 ATR further in your favor. Mechanical, consistent, adapts to volatility regime.
A reasonable composite: move to breakeven at 1R. Trail behind structure thereafter on the timeframe of the trade. Use ATR as a backup if structural levels are unclear.
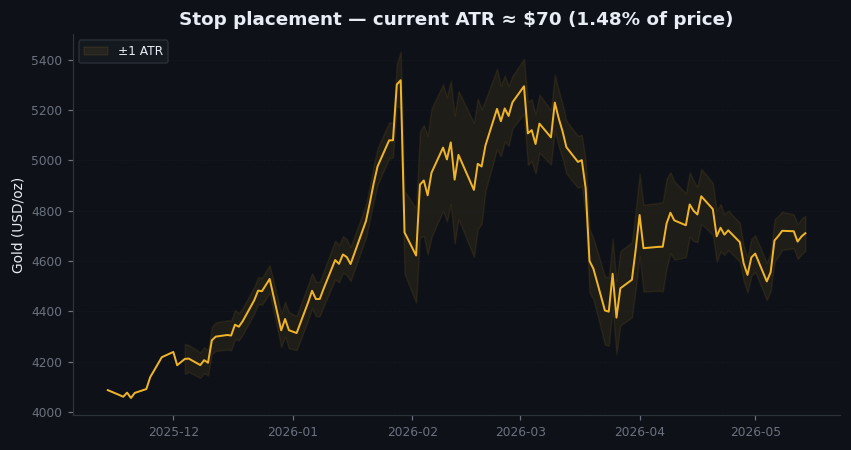
Figure 30.1 — Stop placement examples
Three small annotated charts of gold daily price. Each shows the same general setup (long entry at $2,650) with different stop placements. Chart A: structural stop below recent swing low at $2,615 — distance $35. Chart B: ATR-based stop at 1 ATR below entry at $2,615 — distance $35. Chart C: hybrid stop using the wider of the two — same as A and B in this example since they coincide. The example shows how the methods compare; the hybrid generalizes well across cases where they do not coincide.
When stops do get hit
A stop being hit is not a failure. It is the system working. A trader who feels emotional about stops being hit is misunderstanding what stops are for.
What matters is the aggregate hit rate and the outcome when stops are hit. Some checks:
- Hit rate. If 60% of your trades are getting stopped out, your stops are too tight or your entry timing is poor. Widen stops, reduce size to maintain risk, or improve entry timing.
- Hit then reverse. If stops are getting hit and then price moves in your originally intended direction within a few hours/days, your stops are inside typical noise. Widen and reduce size.
- Hit and continues against you. If stops are getting hit and price continues running, your stops were appropriately placed. The trade thesis was wrong. Move on.
The right response to a stop being hit is to look at the trade after the stop has executed. Did price reverse back toward your direction within a day? If so, the stop was too tight. Did price continue against you for several days? The stop was appropriate; the thesis was wrong.
Trailing stops, in detail
Trailing stops are stops that move automatically as price moves in your favor. They are useful in trending markets but problematic in range markets.
In a strong trend, trailing stops let you ride a move much further than fixed stops would. Set a trail at 2 ATR (for moderate trends) or 3 ATR (for strong trends), and the stop will only get hit on a meaningful pullback. A trader who held the entire 2010-2011 gold rally with a 3-ATR daily trail captured most of the move from $1,250 to $1,920 with a single trade entry.
In a range market, trailing stops produce death by a thousand cuts. Price oscillates back and forth, repeatedly triggering the trail and exiting positions that would have been profitable on the next leg.
The discipline: use trailing stops only after you have confirmed (via Chapter 19's multi-timeframe analysis) that you are in a trending regime. In ranges, use fixed structural stops, manage exits by levels, and accept that you will give back some of the move at the range top/bottom.
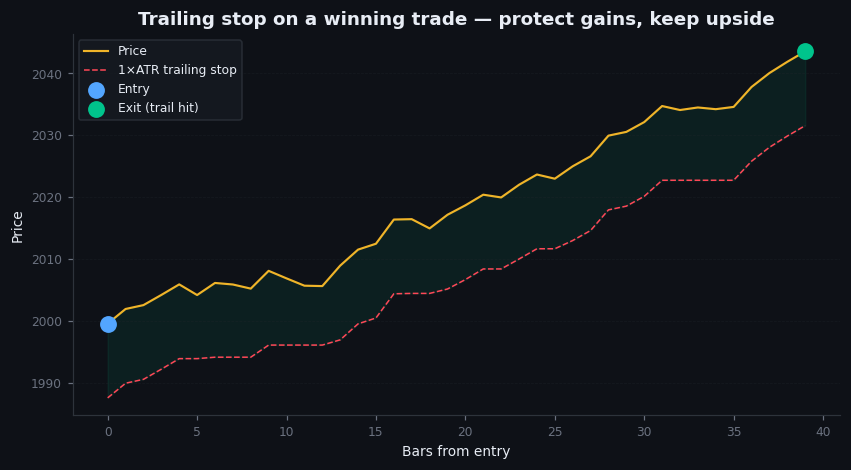
Figure 30.2 — Trailing stop on a winning trade
Daily chart of gold during a sustained rally. Entry at $2,650. 2-ATR trailing stop initially at $2,580. As price rises, the trail follows below — visible as a stepped line below the price action. Final exit at $2,820 when a 2-ATR pullback finally triggered the trail. Total move captured: 6.4% out of the 6.5% available. Annotation explaining the discipline.
Illustrative — schematic — one synthetic winning trade with trailing stop.
On goldintel today
The dashboard does not include stop-management tools. This is a gap where a "trade calculator" feature would be valuable — taking entry, ATR, and desired R-multiple, returning the suggested initial stop, breakeven trigger, and trail parameters.
Until then, calculate stops manually before every trade entry. Place the order in your platform as a hard stop, not mental. Review trailing logic at each daily close.
Common mistakes
- No stops. Discussed. Career-ender.
- Stops too tight. Within typical noise. Stopped out repeatedly even when thesis is correct.
- Stops too wide. Single trade can produce a disproportionate loss. Position sizing becomes irrelevant if stops don't bound the loss to plan.
- Moving stops against the trade. The single most common avoidable error in discretionary trading. If price approaches your stop, the trade thesis is being challenged; widening the stop is rationalization. Honor the stop.
- No trailing. Leaving the initial stop in place through a multi-day winning trade leaves significant profit on the table when the move reverses.
- Aggressive trailing in ranges. Death by a thousand cuts. Use trails only when confirmed in a trend.
Key takeaway
Stops should be placed by structure or ATR, whichever is wider. Move to breakeven at 1R. Trail behind structure or by ATR depending on regime. Never move a stop against the trade.
Further reading:
- Van Tharp, Definitive Guide to Position Sizing. Chapters on stop placement integrate position sizing and stop discipline cleanly.
- Curtis Faith, Way of the Turtle — the Turtle Traders' system was heavily ATR-based for both stops and sizing. The systematic discipline is instructive.
- Marty Schwartz, Pit Bull. Less methodical but the trader's discipline around stops is well-illustrated.
Quick reference
| Setup type | SL distance | Initial TP1 | TP2 / trail |
|---|---|---|---|
| H1 intraday (SMC BOS) | 1.0× H1 ATR | 2.0× ATR (close half) | 4.0× ATR, then BE trail |
| Daily swing | 1.0× D1 ATR | 1.5× ATR | 3.0× ATR or prior H/L |
| Weekly position | 1.5× W1 ATR | 2.0× ATR | Trail under W1 swing lows |
| Event fade (post-CPI) | 0.8× H1 ATR | 1.5× ATR | Close all at 2× ATR |
| Breakout continuation | Below breakout level | 1:1 R:R | Trail under daily SMA20 |